Purpose:
The message queuing service is a scalable system service developed by Microsoft to enable high volume event processing. The message queuing service is included with every Windows 2000/2003 and XP version, although not always installed by default.
Prerequisite(s):
Admin access to the HQMS web server.
Instructions
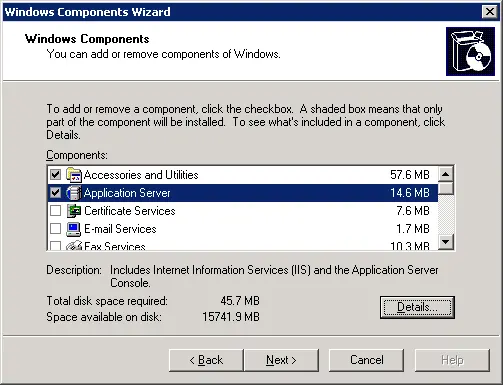
1. Open the Windows Control Panel from the start menu, double-click on Add/Remove Programs and then click on the Windows Components tab to launch and display the Windows components wizard.
2. Click on Application Server and then click Details.
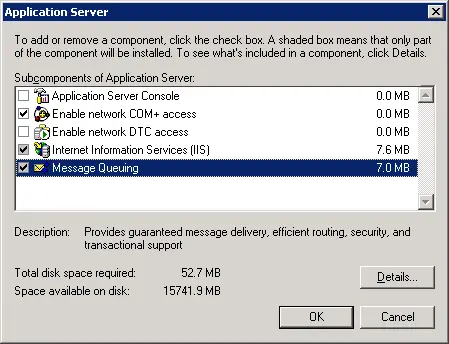
3. If the Message Queuing checkbox is selected it means the service is already installed and you can thus skip the rest of this section. If it is not, then you need to follow the rest of the steps below to install the message queuing service. In the Application Server dialog click on Message Queuing and then click Details.

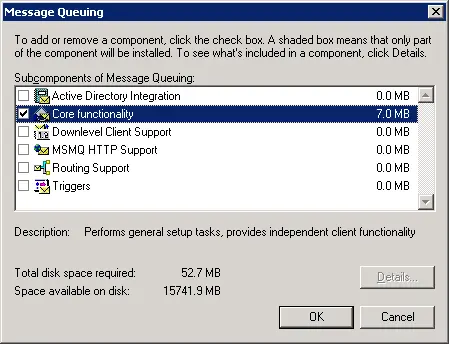
4. In the Message Queuing dialog select the Core functionality checkbox and then click OK.
5. In the Application Server dialog click OK and then click Next in the Windows Components Wizard window to start installing the message queuing service.
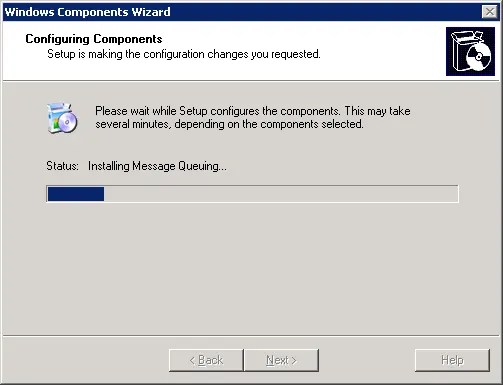
6. When the installation of the message queuing service is complete, you need to click Finish in the Windows Components Wizard. The Message Queuing Service is now installed.
Purpose:
Enabling configurable menu settings for the Search & Menu bar will allow your users to configure which fields are shown when the user views notifications and what information is displayed when the user mouses over notifications. These settings can also be carried over to the newsletter by enabling the option in the user’s notification settings
To enable configurable menu setting:
1. Login to HQMS using an administrator account.
2. Click on Configuration.
3. Click on General Management.
4. Click on Edit and check the option “Enable Configurable Menu” under the System Wide Settings section.
5. Click Save.
To change the menu settings for notifications.
1. Expand notifcations in the Search & Menu bar.
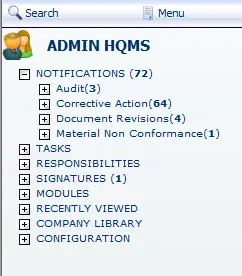
2. Expand a system that has notifications.

3. Click on settings.
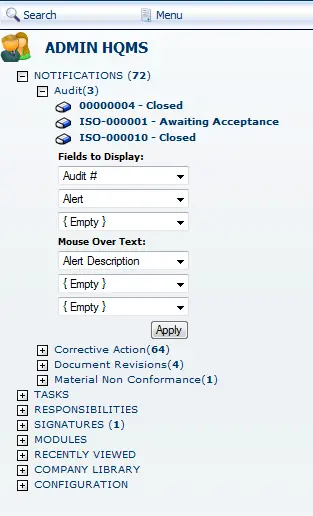
4. Modify the settings you wish to change and click Apply.
Purpose:
This document will help you copy an existing site onto a new server.
Prerequisite(s) :
- HQMS must be installed on the target server.
- SQL server access.
- Web server access.
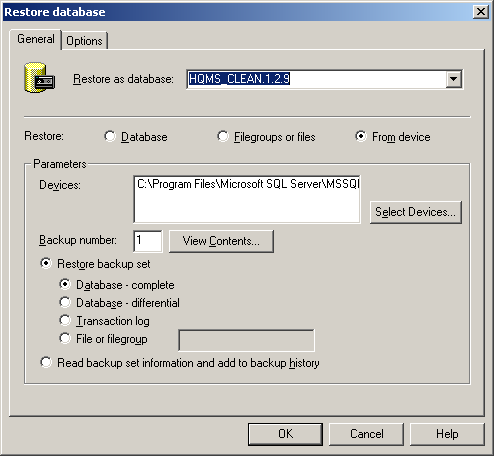
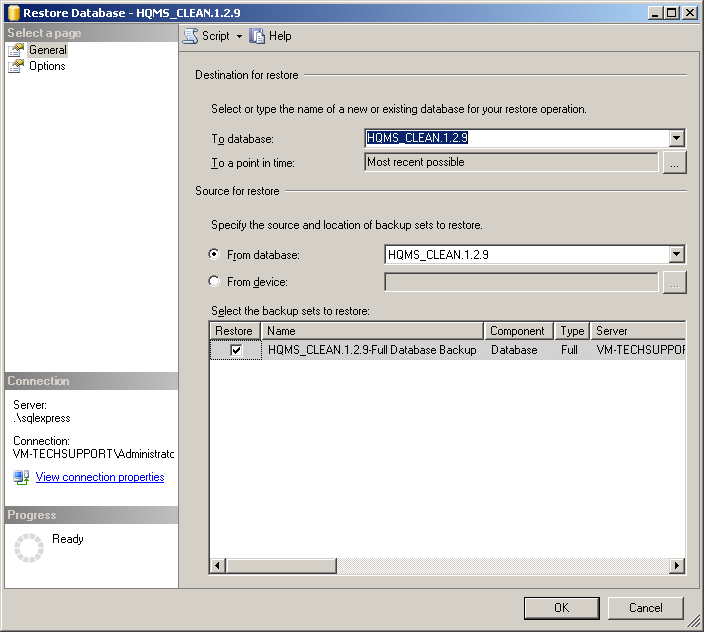
Instructions:
1. Force a backup of the database of the site you are copying.
SQL Server 2000:
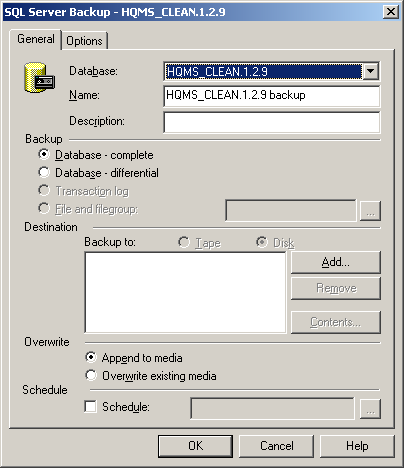
SQL Server 2005:

2. Copy the database backup (.BAK file) to the SQL server that your training database is hosted on and restore the backup over the training database.
Note: Restoring a database with a different name than the one you are restoring to will require additional configuration in the Options tab. Please see your SQL Server help guide if you are unsure how to do this.
SQL Server 2000:
SQL Server 2005:
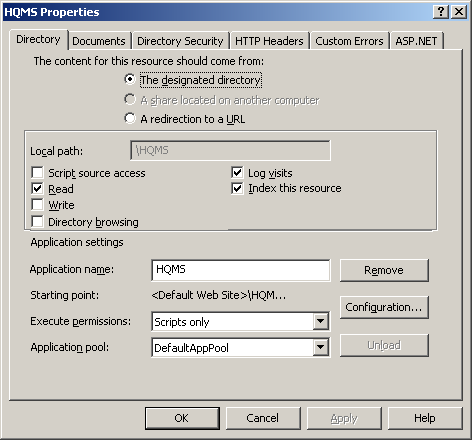
3. Copy HQMS folder containing website files from C:\Inetpub\wwwroot\ (The folder may not be located here, check IIS to find the root of your website) and paste it onto the other server.
4. Check the NTFS rights on the new site to make sure the anonymous user (or whatever user you are using) has read on the entire site and has modify on the AutoRunLog, errorLog, tempimages, and xml folders within the website
5. Open IIS and make sure HQMS is configured as an Application.
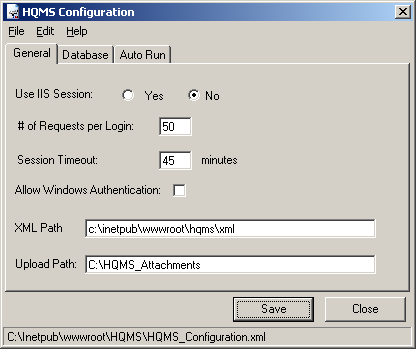
6. Open the HQMS Configuration Application on the copied site’s server and open the HQMS_Configuration.xml file in the website. Correct any changes to the XML Path and Upload Path.
7. Update database connection information.
8. Correct the Server URL and click Save.
9. If you need to copy over attachments, locate you attachments folder (i.e. C:\HQMS_Attachments) and copy it to the other server.
Additional Notes:
Once the site is copied over review the HQMS Installation Guide to ensure everything is configured coreectly.
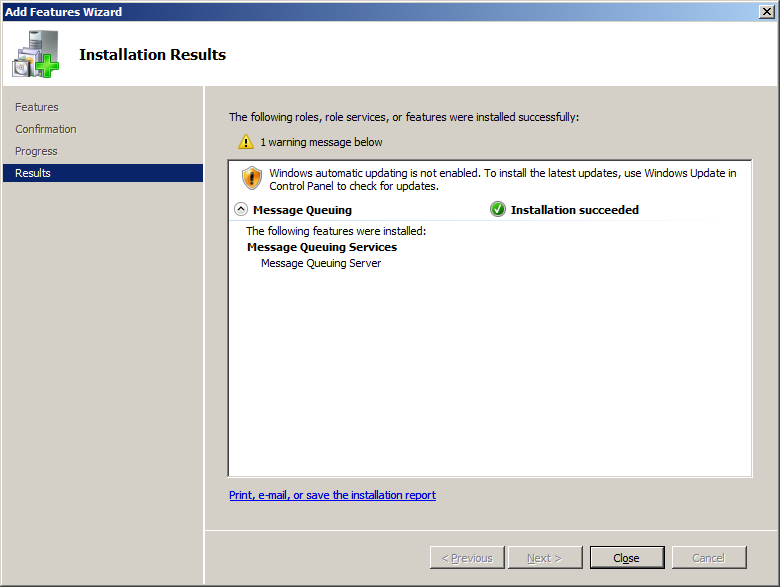
Purpose:
The message queuing service is a scalable service developed by Microsoft to enable high volume event processing. The message queuing service is included with every Windows 2000/2003/2008 and XP version, although not always installed/enabled by default.
Prerequisite(s) :
Admin access to the HQMS web server
Instructions
1. Open Server Manager.
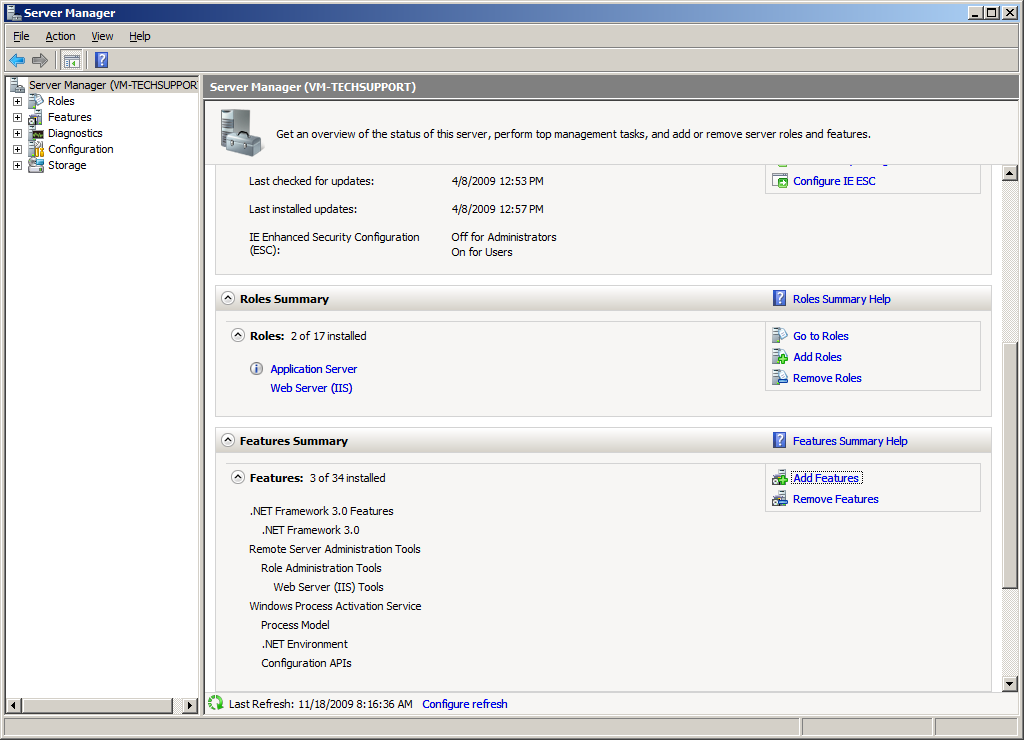
2. Click on Features.
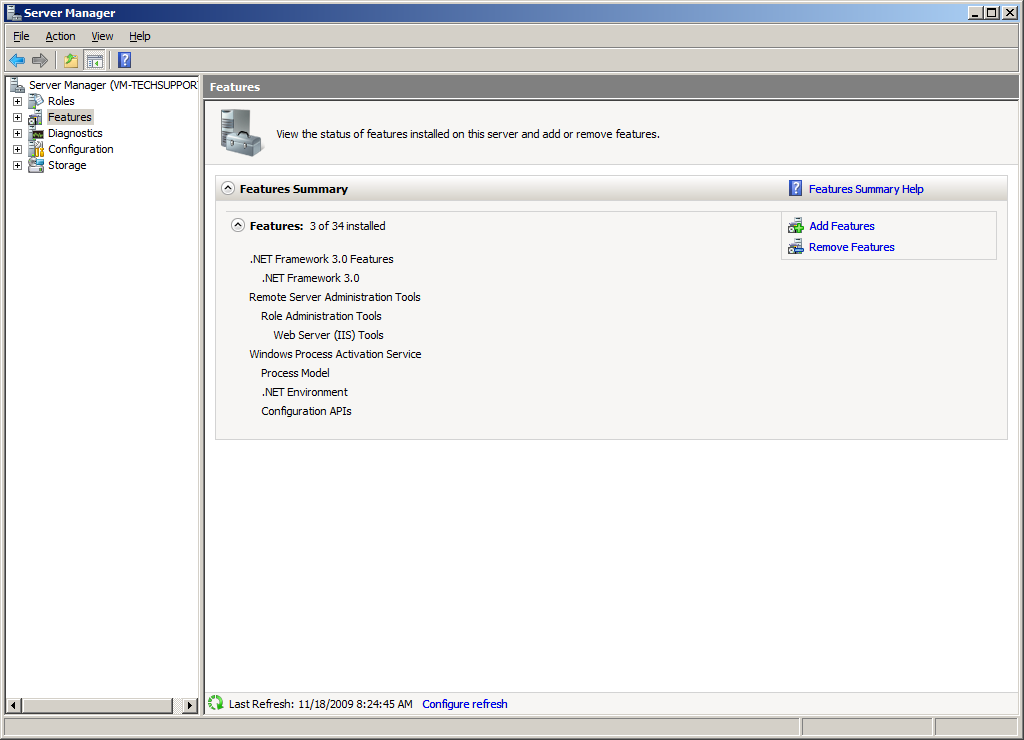
3. Click Add Features.
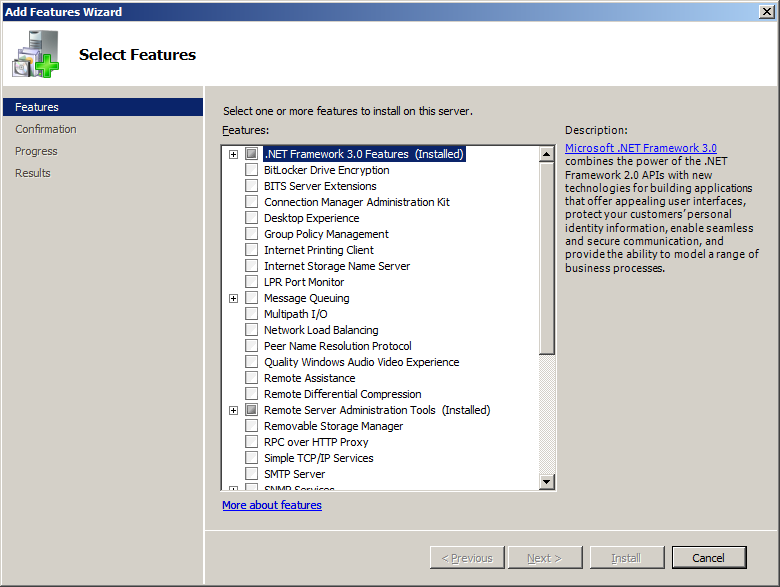
4. Check Message Queuing and click Next
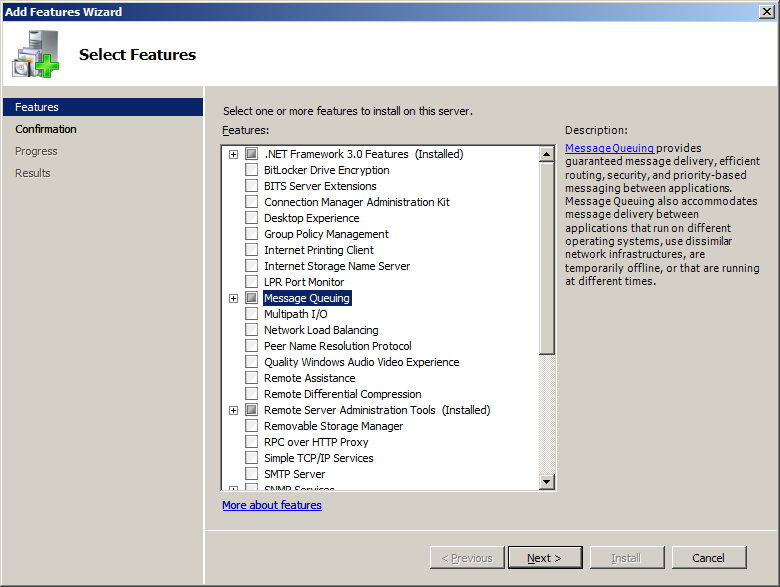
5. Click Install.
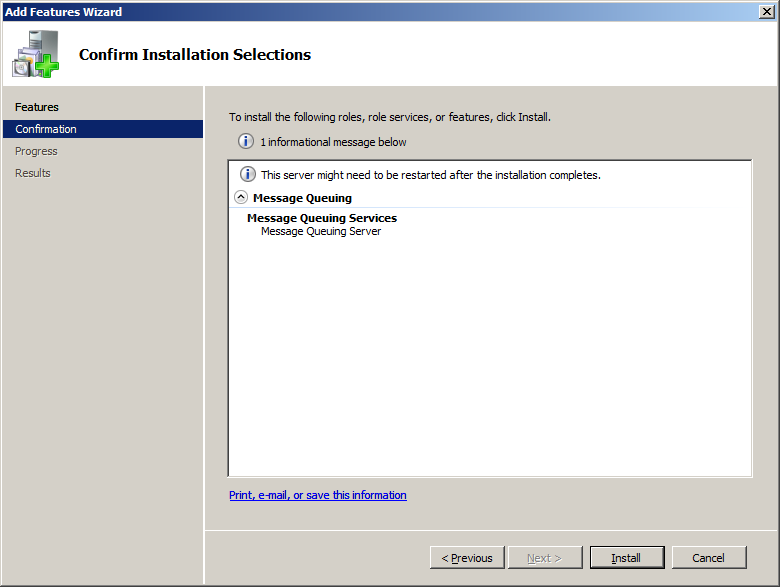
6. Once installation is complete, click Close.
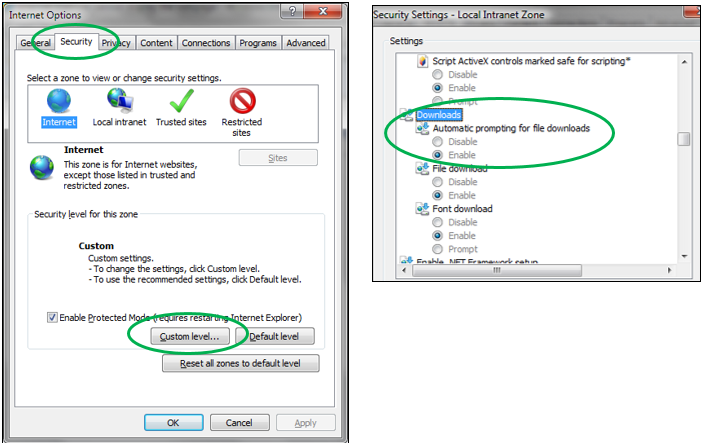
Note: This article applies to Microsoft Internet Explorer versions 7 and 8. In versions 9 and 10, the option mentioned below is already turned on.
The default setting of Internet Explorer will cause a browser refresh during certain circumstances in HQMS. When exporting a report, the user is stuck in a loop when downloads are allowed. When checking out a document, the checkout will have to be cancelled and the document will need to be checked out again. The problem occurs on the computer when a yellow bar is displayed at the top of the screen that says that Internet Explorer has blocked this site from downloading files.
To facilitate report exports and checking out documents, a default setting needs to be changed in Internet Explorer. The setting below will clear this up.
- In Internet Explorer, click Tools, Internet Options.
- Click the Security tab and click the Custom level button in the lower right.
- Scroll down about a third of the page and look for the Downloads section. ActiveX controls are right above thi
- The first setting is Automatic prompting for file downloads. Set it to Enable.
- Click OK, click Yes, click OK.
When a new keyword (selection in drop-down field) is added, it may not be immediately displayed as a choice within a record
Example: in the Audit module, Engineering was added to the Department field. Another user is also logged into HQMS and creates an Audit record. This other user may not see the Engineering choice.
Solution:
1. Delete temporary internet files (cache) and refresh the HQMS page:
a. In Internet Explorer, click Tools, Internet Options.
i. Note: if the Tools menu is not present, push the key on the keyboard.
b. Click the Delete button in the Browsing history section: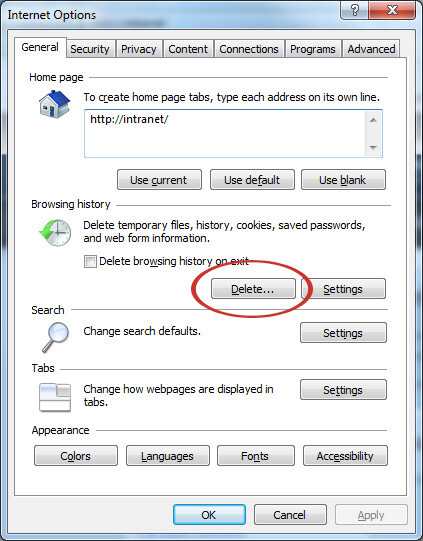
c. Select (check) Temporary Internet Files. Uncheck everything else including “Preserve Favorites website data”: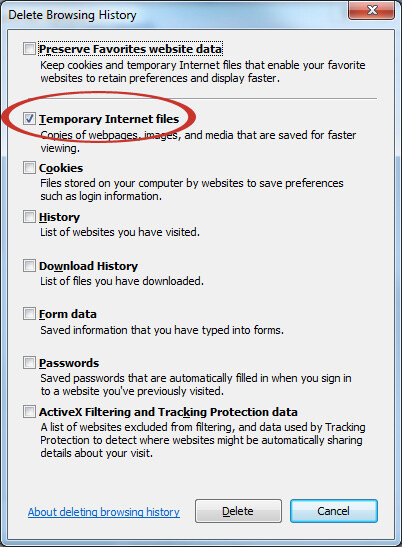
d. Click Delete
e. Click OK to return to HQMS.
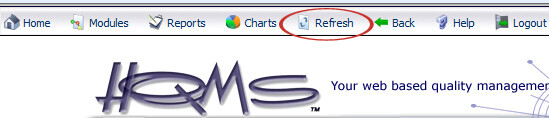
f. Refresh the HQMS page by clicking the HQMS Refresh button between Charts and Back:
2. Logout of HQMS and close all instances of Internet Explorer. Log in to HQMS and resume what was being done.
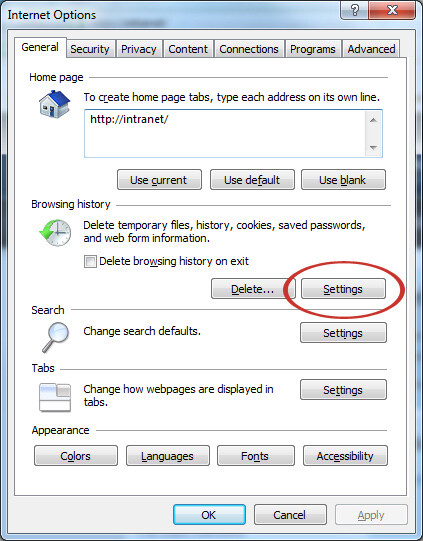
3. You may set your browser to ignore Temporary Internet Files and always load a fresh copy of the webpage:
a. Click Tools, Internet Options
i. Note: if the Tools menu is not present, push the key on the keyboard.
b. Click the Settings button in the Browsing history section:
c. Select “Every time I visit the webpage” at the top and click OK:
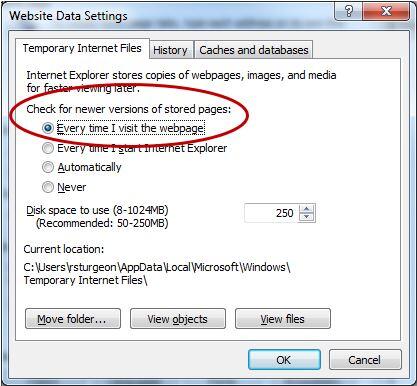
d. Click OK to return to HQMS.
e. Refresh the HQMS page by clicking the HQMS Refresh button between Charts and Back.
Problem: One user might not see all the data that they should within a tab area. This does not refer to being able to see certain records within a module. That is probably an access control issue.
Example: A user is looking at a 7D Corrective Action and wants to view the attachments in the References tab. They see a number next to the References tab. When they click the tab to view the references, they may see less items there than the number would indicate. When another user looks at this same 7D Corrective Action, they see all the references.
Solution:
Sometimes a user’s HQMS state will become corrupt.
The affected user needs to clear their HQMS state:
1. Login as the affected user.
2. Right-click anywhere within HQMS.
3. Click “Clear My State…” and then click OK: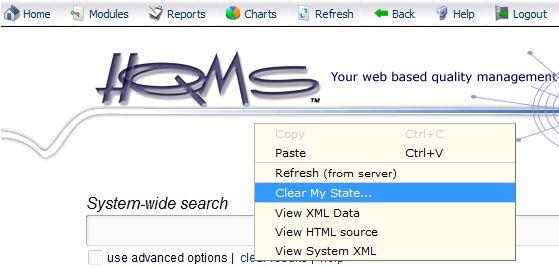
4. Log back into HQMS, find the record that was causing the problem, and see if it is correct now.
Information on what Clear My State does:
No data loss will occur due to this. The user’s list page settings will be reset back to the defaults. This means they will have the default query and layout applied to each list page. The number of records per page will reset back to 25. No saved queries or layouts will be deleted. The Recently Viewed area in the Search and Menu bar will be cleared.
This issue pertains to instances where Audit Master 4’s internal icons set reflects an incorrect company name, instead of “Harrington Group International”. The issue was identified within the released version 4.0.3.3 of Audit Master 4 and has been resolved in later version releases of the application. Please check your Audit Master 4 version by launching the application, then by clicking on “Help” at the top of the main window, followed by selecting the “About” option in the related dropdown window. Your application’s version will display in the “About” window.
If you find that you have version 4.0.3.3 installed, please make a backup copy of your database file and then uninstall your current version of Audit Master 4. Once Audit Master 4 has been successfully uninstalled, please download and then install the latest version of the application found at the below link:
https://www.harrington-group.com/support/downloads/AuditMaster/Version4/AuditMaster4.zip
If you need a hand with the installation process of the application, please reach out to Technical Support at 407-382-8750 between the hours of 9AM – 6PM Monday through Friday. You may also submit an email based support request via the following link:
This issue pertains to an instance where overdue audits show up in the coming due list for the Audit Master 4 task tray notification tool. The issue was identified with the initial release of Audit Master 4, version 4.0.0.0 and has been resolved in later version releases of the application. Please check your Audit Master 4 version by launching the application, then by clicking on “Help” at the top of the main window, followed by selecting the “About” option in the related dropdown window. Your application’s version will display in the “About” window.
If you find that you have version 4.0.0.0 installed, please make a backup copy of your database file and then uninstall your current version of Audit Master 4. Once Audit Master 4 has been successfully uninstalled, please download and then install the latest version of the application found at the below link:
https://www.harrington-group.com/support/downloads/AuditMaster/Version4/AuditMaster4.zip
If you need a hand with the installation process of the application, please reach out to Technical Support at 407-382-8750 between the hours of 9AM – 6PM Monday through Friday. You may also submit an email based support request via the following link:
This issue pertains to an instance where Audit Master 4’s “Findings view” does not successfully include records that don’t have a set finding type at the record level. The issue was identified with the initial release of Audit Master 4, version 4.0.0.0 and has been resolved in later version releases of the application. Please check your Audit Master 4 version by launching the application, then by clicking on “Help” at the top of the main window, followed by selecting the “About” option in the related dropdown window. Your application’s version will display in the “About” window.
If you find that you have version 4.0.0.0 installed, please make a backup copy of your database file and then uninstall your current version of Audit Master 4. Once Audit Master 4 has been successfully uninstalled, please download and then install the latest version of the application found at the below link:
https://www.harrington-group.com/support/downloads/AuditMaster/Version4/AuditMaster4.zip
If you need a hand with the installation process of the application, please reach out to Technical Support at 407-382-8750 between the hours of 9AM – 6PM Monday through Friday. You may also submit an email based support request via the following link:
This issue pertains to an instance where Audit Master 4’s built-in progress bar does not properly display accurate conversion progress during database conversion. The issue was identified with the initial release of Audit Master 4, version 4.0.0.0 and has been resolved in later version releases of the application. Please check your Audit Master 4 version by launching the application, then by clicking on “Help” at the top of the main window, followed by selecting the “About” option in the related dropdown window. Your application’s version will display in the “About” window.
If you find that you have version 4.0.0.0 installed, please make a backup copy of your database file and then uninstall your current version of Audit Master 4. Once Audit Master 4 has been successfully uninstalled, please download and then install the latest version of the application found at the below link:
https://www.harrington-group.com/support/downloads/AuditMaster/Version4/AuditMaster4.zip
If you need a hand with the installation process of the application, please reach out to Technical Support at 407-382-8750 between the hours of 9AM – 6PM Monday through Friday. You may also submit an email based support request via the following link:
This issue pertains to an instance where Data truncation occurs within the Completed Audit Checklist report. Extraneous data usually contained in memo fields sometimes appears cut off in related fields of the Audit Checklist report report. The issue was identified with the initial release of Audit Master 4, version 4.0.0.0 and has been resolved in later version releases of the application. Please check your Audit Master 4 version by launching the application, then by clicking on “Help” at the top of the main window, followed by selecting the “About” option in the related dropdown window. Your application’s version will display in the “About” window.
If you find that you have version 4.0.0.0 installed, please make a backup copy of your database file and then uninstall your current version of Audit Master 4. Once Audit Master 4 has been successfully uninstalled, please download and then install the latest version of the application found at the below link:
https://www.harrington-group.com/support/downloads/AuditMaster/Version4/AuditMaster4.zip
If you need a hand with the installation process of the application, please reach out to Technical Support at 407-382-8750 between the hours of 9AM – 6PM Monday through Friday. You may also submit an email based support request via the following link:
This issue pertains to an instance where Audit Item average values do not appear to function correctly, or display on the Audit Performance report. The issue was identified with the initial release of Audit Master 4, version 4.0.0.0 and has been resolved in later version releases of the application. Please check your Audit Master 4 version by launching the application, then by clicking on “Help” at the top of the main window, followed by selecting the “About” option in the related dropdown window. Your application’s version will display in the “About” window.
If you find that you have version 4.0.0.0 installed, please make a backup copy of your database file and then uninstall your current version of Audit Master 4. Once Audit Master 4 has been successfully uninstalled, please download and then install the latest version of the application found at the below link:
https://www.harrington-group.com/support/downloads/AuditMaster/Version4/AuditMaster4.zip
If you need a hand with the installation process of the application, please reach out to Technical Support at 407-382-8750 between the hours of 9AM – 6PM Monday through Friday. You may also submit an email based support request via the following link:
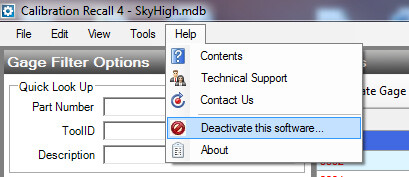
Problem: Program is not activated after it was already activated. This problem can occur if the product was activated while a different user was logged into the computer. In other words, if an IT administrator logs in to the computer, activates the software, and then instructs the regular user to login.
More information: A product may only be activated for one user.
Solution: The product will need to be deactivated from the original user and then activated again for the new user.
1. Login to the computer as the original user that activated the product.
2. Open the program in question.
3. Click “Help, Deactivate this software…”:
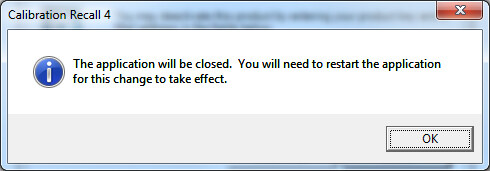
4. Click the Deactivate button:

5. Click OK:
6. Login as the actual user for the product and open it up.
7. Click the Activate now button and proceed with activating as before. Only proceed to step 8 and 9 if you are unable to activate.
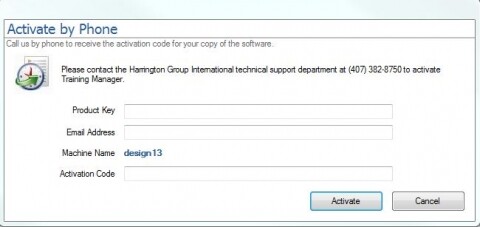
8. If there is a problem communicating with our activation server, you may need to use the Activate by Phone option:

9. Click Activate by Phone and call our technical support department at 407-382-8750. We will ask for the information on the Activate by Phone screen and supply you with an Activation Code.
Purpose:
This document serves to demonstrate the methods of activating the Harrington Group’s Training Manager 4 product. Normal, Phone, and Reactivation topics will be covered.
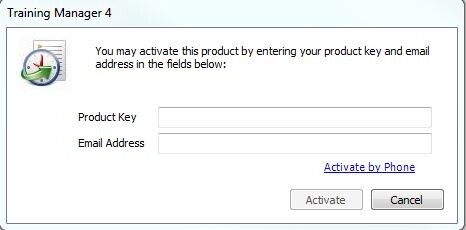
I. Standard Training Manager 4 Activation:
1. After installing the program, you will receive a prompt asking you to activate the software.
2. Enter your license key for the product, followed by your email address. Next, click the “Activate” button.
3. If you are unable to activate the software via this method, it is possibly due to your pc being behind a network proxy server, a network firewall, or a local firewall application. If that is the case, you may receive an “Unable to activate” error message. If you receive this message, please proceed to the Phone Activation process.
II. Training Manager 4 Phone Activation:
1. You will now need to contact the Harrington Group’s technical support department to request an Activation code be given to you over the phone.
2. You will now need to contact the Harrington Group’s technical support department to request an Activation code be given to you over the phone
3. Contact the Harrington Group’s technical support department at, 407-382-8750. Be prepared to give the support representative your Product Key, your Email Address, and your machine name. Having this information available will allow the support representative to generate the Activation code required to activate your product.
4.Once all of the fields contain the required data, press the “Activate” button.
III. Training Manager 4 Reactivation:
1. The Training Manager 4 Reactivation process is required if you are moving the product to a new pc, or simply giving the license over to another user because you no longer require usage of the application.
2. In order to accomplish this, you will need to contact The Harrington Group’s Technical Support Department for assistance at 407-382-8750. The technical support representative will deactivate the software for you so that the program can be reactivated on an alternate pc, or Windows User Profile. You may also need the following information when calling, the product registration license, your email address, and the new machine name of the pc where Training Manager 4 will be installed.
This issue pertains to the instance where Training management software users are able to create Employee, Training, and Role name records which have blank names. This issue can lead to inconsistencies in how the application queries and subsequently displays data. The issue was identified within the 4.0.0.0 release of Training Manager 4 and has been resolved in later releases of the application. Please check your Training Manager 4 version by launching the application, then by clicking on “Help” at the top of the main window, followed by selecting the “About” option in the related dropdown window. Your application’s version will display in the “About” window.
If you find that you have version 4.0.0.0 installed, please make a backup copy of your database file and then uninstall your current version of Training Manager 4. Once Training Manager 4 has been successfully uninstalled, please download and then install the latest version of the application found at the below link:
If you need a hand with the installation process of the application, please reach out to Technical Support at 407-382-8750 between the hours of 9AM – 6PM Monday through Friday. You may also submit an email based support request via the following link:
This issue pertains to instances when a user attempts to export Role, Training, or Employee lists to Microsoft Excel format, but the exported rows and cells do not correctly display in grid formation. The issue was identified within the 4.0.0.0 release of Training Manager 4 and has been resolved in later releases of the application. Please check your Training Manager 4 version by launching the application, then by clicking on “Help” at the top of the main window, followed by selecting the “About” option in the related dropdown window. Your application’s version will display in the “About” window.
If you find that you have version 4.0.0.0 installed, please make a backup copy of your database file and then uninstall your current version of Training Manager 4. Once Training Manager 4 has been successfully uninstalled, please download and then install the latest version of the application found at the below link:
If you need a hand with the installation process of the application, please reach out to Technical Support at 407-382-8750 between the hours of 9AM – 6PM Monday through Friday. You may also submit an email based support request via the following link:
This issue pertains to the instance where custom user definable fields cannot be added or diplayed on the included detail reports. The issue was identified within the 4.0.0.0 release of Training Manager 4 and support for this feature has been added in later releases of the application. Please check your Training Manager 4 version by launching the application, then by clicking on “Help” at the top of the main window, followed by selecting the “About” option in the related dropdown window. Your application’s version will display in the “About” window.
If you find that you have version 4.0.0.0 installed, please make a backup copy of your database file and then uninstall your current version of Training Manager 4. Once Training Manager 4 has been successfully uninstalled, please download and then install the latest version of the application found at the below link:
If you need a hand with the installation process of the application, please reach out to Technical Support at 407-382-8750 between the hours of 9AM – 6PM Monday through Friday. You may also submit an email based support request via the following link:
This issue pertains to an instance where users are unable to query data that exists in the “InActive” field by means of a user generated custom query in the Training Status section of the application. The issue was identified within the 4.0.0.0 release of Training Manager 4 and support for this feature has been added in later releases of the application. Please check your Training Manager 4 version by launching the application, then by clicking on “Help” at the top of the main window, followed by selecting the “About” option in the related dropdown window. Your application’s version will display in the “About” window.
If you find that you have version 4.0.0.0 installed, please make a backup copy of your database file and then uninstall your current version of Training Manager 4. Once Training Manager 4 has been successfully uninstalled, please download and then install the latest version of the application found at the below link:
If you need a hand with the installation process of the application, please reach out to Technical Support at 407-382-8750 between the hours of 9AM – 6PM Monday through Friday. You may also submit an email based support request via the following link:
This issue pertains to an instance where the application’s reports are unable to be exported to either Excel, or Pdf formats. The issue was identified within the 4.0.0.0 release of Training Manager 4 and support for these features have been added in later releases of the application. Please check your Training Manager 4 version by launching the application, then by clicking on “Help” at the top of the main window, followed by selecting the “About” option in the related dropdown window. Your application’s version will display in the “About” window.
If you find that you have version 4.0.0.0 installed, please make a backup copy of your database file and then uninstall your current version of Training Manager 4. Once Training Manager 4 has been successfully uninstalled, please download and then install the latest version of the application found at the below link:
If you need a hand with the installation process of the application, please reach out to Technical Support at 407-382-8750 between the hours of 9AM – 6PM Monday through Friday. You may also submit an email based support request via the following link:
This issue pertains to the instance where the application’s report logo option is unable to use .bmp and .gif file types for the built in reports in terms of creating user generated report logos. The issue was identified within the 4.0.0.0 release of Training Manager 4 and support has been added for that feature in later releases of the application. Please check your Training Manager 4 version by launching the application, then by clicking on “Help” at the top of the main window, followed by selecting the “About” option in the related dropdown window. Your application’s version will display in the “About” window.
If you find that you have version 4.0.0.0 installed, please make a backup copy of your database file and then uninstall your current version of Training Manager 4. Once Training Manager 4 has been successfully uninstalled, please download and then install the latest version of the application found at the below link:
If you need a hand with the installation process of the application, please reach out to Technical Support at 407-382-8750 between the hours of 9AM – 6PM Monday through Friday. You may also submit an email based support request via the following link:
This issue pertains to instances where records sometimes do not automatically save (without pressing the save button) when switching between various rows and columns in record lists. The issue was identified within the initial 4.0.0.0 release of Training Manager 4 and has been fixed in later releases of the application. Please check your Training Manager 4 version by launching the application, then by clicking on “Help” at the top of the main window, followed by selecting the “About” option in the related dropdown window. Your application’s version will display in the “About” window.
If you find that you have version 4.0.0.0 installed, please make a backup copy of your database file and then uninstall your current version of Training Manager 4. Once Training Manager 4 has been successfully uninstalled, please download and then install the latest version of the application found at the below link:
If you need a hand with the installation process of the application, please reach out to Technical Support at 407-382-8750 between the hours of 9AM – 6PM Monday through Friday. You may also submit an email based support request via the following link:
Problem: Program is not activated after it was already activated. This problem can occur if the product was activated while a different user was logged into the computer. In other words, if an IT administrator logs in to the computer, activates the software, and then instructs the regular user to login.
More information: A product may only be activated for one user.
Solution: The product will need to be deactivated from the original user and then activated again for the new user.
1. Login to the computer as the original user that activated the product.
2. Open the program in question.
3. Click “Help, Deactivate this software…”:
4. Click the Deactivate button:

5. Click OK:

6. Login as the actual user for the product and open it up.
7. Click the Activate now button and proceed with activating as before. Only proceed to step 8 and 9 if you are unable to activate.
8. If there is a problem communicating with our activation server, you may need to use the Activate by Phone option:

9. Click Activate by Phone and call our technical support department at 407-382-8750. We will ask for the information on the Activate by Phone screen and supply you with an Activation Code.
This issue pertains to instances where users encounter a “Run Time 339” error message when installing the application. This issue impacts the application’s installation process and generally halts the standard installation.
To resolve this issue, please click any available “cancel” options on the active installation screens in order to close the failed installation process. Next, perform a file search for these specific files: “crpeaut32.dll” “crystl32.ocx” “crpe32.dll”. Once these files have been located, delete them. After deleting the previous three files, backup your database file, then uninstall the application via the Windows Control Panel’s “Add / Remove Programs” feature. You will now need to download and then install the latest version of the application. The download link for the latest version of Maintenance Log Pro is below:
https://www.harrington-group.com/support/downloads/MaintenanceLogPro/Setup.exe
Please save the file from the above link to your Windows Desktop. Prior to installing the application, ensure that your Windows profile has full administrative access. Finally, double click the downloaded “Setup.exe” file to begin the installation.
If you need any additonal assistance with this process, please reach out to Technical Support at 407-382-8750 between the hours of 9AM – 6PM Monday through Friday. You may also submit an email based support request via the following link:
https://hgint.com/maintenance-log-pro-online-support-request
This issue pertains to an instance where Maintenance Log Pro does not appear to save user defined column’s width after closing the application and reopening it.
To resolve this issue, please define the required column widths in the list screen of the application, and then at the top of the program’s main window, click on “Tools”, “Options”, the “Preferences” tab, and place a check mark in the “Save grid layouts when exiting” option.
If you need any additonal assistance with this process, please reach out to Technical Support at 407-382-8750 between the hours of 9AM – 6PM Monday through Friday. You may also submit an email based support request via the following link:
https://hgint.com/maintenance-log-pro-online-support-request
This issue pertains to instances when users attempt to open a database in Maintenance Log Pro, they receive a “Please Open a Database with Read / Write Access” error message.
We have identified the issue is generally caused by a user opening the database in Microsoft Access and subsequently converting said database to a later Access format, other than Access 97. Also, the issue can occur if a database file exists on a Windows network, and the read, write, and modify permissions to the file itself are revoked by an administrator for a specific user.
To solve the issue, please reach out to Technical Support at 407-382-8750 between the hours of 9AM – 6PM Monday through Friday. We will be able to convert the database to the correct format for you if that appears to be the problem. You may also submit an email based support request via the following link:
https://hgint.com/maintenance-log-pro-online-support-request
This issue pertains to instances when Maintenance Log Pro users attempt to print a work order form, they experience vertical lines displaying in the task section of the second, and later pages.
We have identified that the vertical line issue is caused by too much data existing in the related “Notes” field of the Equipment Detail screen. To solve the issue, please please reduce the amount of data in the “Notes” field and try to print the work order again.
If you need a hand with this process, or any further troubleshooting, please reach out to Technical Support at 407-382-8750 between the hours of 9AM – 6PM Monday through Friday. You may also submit an email based support request via the following link:
https://hgint.com/maintenance-log-pro-online-support-request
This issue pertains to an instance where Maintenance Log Pro users receive a “Run Time Error 444” error message when attempting to create a new record in the application. The issue was identified within the 1.1.0 release of the Maintenance Log Pro software.
The complete message is below:
Run Time Error 444
Source: MaintenanceLogPro Routine name: frmEquipment.dataEquipment.reposition
Description: Method not applicable in this context.
To solve the issue, users will need to change their Windows Short Date format via the Windows Control Panel’s Regional settings to “mm/dd/yyyy”.
If you need a hand with this process, please reach out to Technical Support at 407-382-8750 between the hours of 9AM – 6PM Monday through Friday. If it is more convenient, you may also submit an email based support request via the following link:
https://hgint.com/maintenance-log-pro-online-support-request
This issue pertains to an instance where Maintenance Log Pro users receive a “Run Time 339” error message when attempting to generate a report in Maintenance Log Pro. This issue occurs when the file, “Crystl32.ocx” is not correctly registered in Windows.
To solve the issue, please perform a Windows search for the “Crystl32.ocx” file, rename it to “Crystl32.old”. Next, please make a backup copy of your Maintenance Log Pro database file and then uninstall the Maintenance Log Pro application. After uninstallation is successfully completed, please download the latest version of the Maintenace Log Pro software at the following link:
https://www.harrington-group.com/support/downloads/MaintenanceLogPro/Setup.exe
Save the downloaded file to your Windows desktop. Prior to running the “Setup.exe” file, ensure that your Windows profile has full administrative access rights to install applications. Finally, double click on the “Setup.exe” file to begin installation of the Maintenance Log Pro application.
If you need a hand with this process, please reach out to Technical Support at 407-382-8750 between the hours of 9AM – 6PM Monday through Friday. You may also submit an email based support request via the following link:
https://hgint.com/maintenance-log-pro-online-support-request
This issue pertains to an instance where Maintenance Log Pro users receive an “Overflow” error message upon trying to open a database via Maintenance Log Pro software. The issue was identified within the 1.1.0 release of the Maintenance Log Pro software.
To solve the issue, please identify which version of Windows you have and download the appropriate “Microsoft Data Access Component” software specific to your Windows version. Typically Microsoft hosts these files and they may be found via Microsoft.com’s search engine. The MDAC file found at the below link may also support your version of windows:
http://www.microsoft.com/en-us/download/details.aspx?id=5793
If you need a hand with this process, please reach out to Technical Support at 407-382-8750 between the hours of 9AM – 6PM Monday through Friday. You may also submit an email based support request via the following link:
https://hgint.com/maintenance-log-pro-online-support-request
This issue pertains to instances where Maintenance Log Pro displays the year value listed in related date fields as “1920”. The issue was identified within the 1.1.0 release of the Maintenance Log Pro software and is related to the Y2k bug which affected older versions of Windows operating systems.
To solve the issue, users will need to change their Windows Short Date format via the Windows Control Panel’s Regional settings to “mm/dd/yyyy”.
If you need a hand with this process, please reach out to Technical Support at 407-382-8750 between the hours of 9AM – 6PM Monday through Friday. If it is more convenient, you may also submit an email based support request via the following link:
https://hgint.com/maintenance-log-pro-online-support-request
This issue pertains to an instance where Maintenance Log Pro users receive a “Run Time Error 429” error message when attempting to launch the applicaton. The issue was identified within the 1.1.0 release of the Maintenance Log Pro software.
To solve the issue, please make a backup copy of your database file and then uninstall your current version of Maintenance Log Pro. Once the application has been successfully uninstalled, please download and then install the latest version of the program found at the below link:
https://www.harrington-group.com/support/downloads/MaintenanceLogPro/Setup.exe
Prior to installing the application, please ensure that your Windows user profile has full administrative rights and appropriate access levels.
If you need a hand with the installation process of the application, please reach out to Technical Support at 407-382-8750 between the hours of 9AM – 6PM Monday through Friday. You may also submit an email based support request via the following link:
https://hgint.com/maintenance-log-pro-online-support-request
This issue pertains to an instance where Maintenance Log Pro users are unable to complete the installation of the Maintenance Log Pro appliction due to the lack of a “demonstration” license key.
If this issue is encountered, please reach out to our Technical Support at 407-382-8750 between the hours of 9AM– 6PM Monday through Friday as we can assist by providing a demonstration license for the application. If however it is more convenient, users may also submit an email based support request via the following link:
https://hgint.com/maintenance-log-pro-online-support-request
This issue pertains to instances where Maintenance Log Pro users receive a “Read Only” error message when attempting to open any of the applicaton’s database files. This may also affect a user’s ability to create a new database as well. The issue was identified within the 1.1.0 release of the Maintenance Log Pro software. To solve the issue, perform a Windows search for the following file, “msjet35.dll” and delete it.
To proceed, please make a backup copy of your database file and then uninstall your current version of Maintenance Log Pro. Once the application has been successfully uninstalled, please download and then install the latest version of the program found at the below link:
https://www.harrington-group.com/support/downloads/MaintenanceLogPro/Setup.exe
If you need a hand with the installation process of the application, please reach out to Technical Support at 407-382-8750 between the hours of 9AM – 6PM Monday through Friday. You may also submit an email based support request via the following link:
https://hgint.com/maintenance-log-pro-online-support-request
Purpose:
This document provides a solution to miscellaneous issues accompanying The Harrington Group’s desktop products in regard to report generation and printing capabilities. This process applies to the Audit Master 3, Corrective Action 6, Calibration Recall 3.5, Document Control System 2, and Maintenance Log Pro products.
Prerequisite(s):
User with administrative privileges.
Instructions:
1. Perform a Windows search for these three files, Cpeaut32.dll, Crpe32.dll, and Crystal32.ocx. If they are found to exist on the client pc, delete them.
2. Next, browse to your product’s installation directory. These paths are shown below.
Audit Master 3: C:\Program Files\CA6
Corrective Action 6: C:\Program Files\Audit Master 3
Calibration Recall 3.5: C:\Program Files\Recall
Document Control System 2: C:\Program Files\Document Control System 2
Maintenance Log Pro: C:\Program Files\Maintenance Log Pro
3. From inside your product’s installation folder, you will need to locate your database file(s). By default, Harrington Group desktop applications store their application databases in the installation folder. Our software’s database files are standard Microsoft Access database files that have an “.mdb” file extension. They are represented by an icon which appears to display a miniature maroon colored key. If you see any file(s) like this inside your installation folder, make a copy of them then paste them on your windows desktop or a backup folder. If you do not find it in the installation folder, chances are it’s somewhere else on your pc, such as your My Documents folder, a shared drive or in a network folder on a local server.
4. While in your product’s installation directory, double click on the icon called, “Unwise.exe”.
5. The program’s uninstaller will launch, select “Custom”, then click on “Select All”, then click the “Next” button, “Select All” again, “Next”, “Select All”, “Next” button…keep repeating “Select All” and “Next” until the button changes to say “Finish”.
6. When the uninstall process is finished, proceed to our website to download the latest version of your product, or reinstall the application from disc. A link to our website is below.
Harrington Group Download Page
7. Install the product normally by proceeding through the multiple prompts. After product installation is complete, launch the program. When one of our desktop applications launch, by default it will try to open the demo database it installed with. To avoid this, click the “Cancel” button on the very first login window you see. Next, click the “File” button in the File menu then click on “Open Database.”
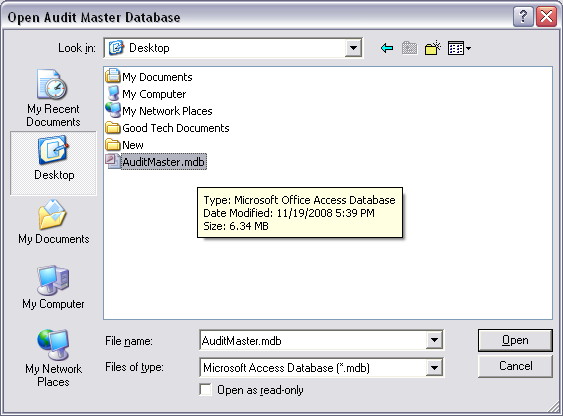
8. From the open file window, you will need to browse to your database file, click on it once, then press the “Open” button. If you have copied and pasted your database file from the installation folder to your desktop screen as demonstrated in step 3, you will need to browse to your desktop via the file open window, click on your database and press the “Open” button. If your database file did not reside in the program’s installation folder, you will need to locate where it is on either your pc, a shared drive, or on your local server. If you cannot find your database file, your IT Manager may be able to assist you by searching for an “.mdb” file that you recognize. The “Open File” window resembles the below image. Note: After the program has been reinstalled it is recommended that you move your database file(s) back into the installation directory if you previously moved them before the uninstall. If they are in an external location, then you can leave them.
9. After opening your database via the open file window, you will be prompted with a login screen. Login to your database as you normally would.
10. Try to run a report and observe if the original report issue still exists, if it does, try contacting us for further support via e-mail at: [email protected].
Additional Comments:
This document should be used as a first step in troubleshooting any reports issues. Please follow this procedure before contacting technical support.
This issue pertains to an instance where the Calibration Recall 4 application freezes upon encountering an error message during the database conversion process. The issue was identified within the 4.0.0.7 release of Calibration Recall 4 and has been fixed in later releases of the application. Please check your Calibration Recall 4 version by launching the application, then by clicking on “Help” at the top of the main window, followed by selecting the “About” option in the related dropdown window. Your application’s version will display in the “About” window.
If you find that you have version 4.0.0.7 installed, please make a backup copy of your database file and then uninstall your current version of Calibration Recall 4. Once Calibration Recall 4 has been successfully uninstalled, please download and then install the latest version of the application found at the below link:
https://www.harrington-group.com/support/downloads/CalibrationRecall/Version4/CalibrationRecall4.zip
If you need a hand with the installation process of the application, please reach out to Technical Support at 407-382-8750 between the hours of 9AM – 6PM Monday through Friday. You may also submit an email based support request via the following link:
This issue pertains to instances where sizing issues appear on the Login and Email Settings forms when Windows fonts are set to 125% size. Sometimes this issue may cause text to appear outside of the Login and Email Settings boxes. The issue was identified within the 4.0.0.7 release of Calibration Recall 4 and has been fixed in later releases of the application. Please check your Calibration Recall 4 version by launching the application, then by clicking on “Help” at the top of the main window, followed by selecting the “About” option in the related dropdown window. Your application’s version will display in the “About” window.
If you find that you have version 4.0.0.7 installed, please make a backup copy of your database file and then uninstall your current version of Calibration Recall 4. Once Calibration Recall 4 has been successfully uninstalled, please download and then install the latest version of the application found at the below link
https://www.harrington-group.com/support/downloads/CalibrationRecall/Version4/CalibrationRecall4.zip
If you need a hand with the installation process of the application, please reach out to Technical Support at 407-382-8750 between the hours of 9AM – 6PM Monday through Friday. You may also submit an email based support request via the following link:
This issue pertains to an instance where selections in the application’s “Custodian” drop down list are not sorted alphanumerically. The issue was identified within the 4.0.0.7 release of Calibration Recall 4 and has been fixed in later releases of the application. Please check your Calibration Recall 4 version by launching the application, then by clicking on “Help” at the top of the main window, followed by selecting the “About” option in the related dropdown window. Your application’s version will display in the “About” window.
If you find that you have version 4.0.0.7 installed, please make a backup copy of your database file and then uninstall your current version of Calibration Recall 4. Once Calibration Recall 4 has been successfully uninstalled, please download and then install the latest version of the application found at the below link:
https://www.harrington-group.com/support/downloads/CalibrationRecall/Version4/CalibrationRecall4.zip
If you need a hand with the installation process of the application, please reach out to Technical Support at 407-382-8750 between the hours of 9AM – 6PM Monday through Friday. You may also submit an email based support request via the following link:
This issue pertains to an instance where Calibration Recall 4’s database path does not appear in the status bar of the application. The issue was identified within the 4.0.0.7 release of Calibration Recall 4 and has been fixed in later releases of the application. Please check your Calibration Recall 4 version by launching the application, then by clicking on “Help” at the top of the main window, followed by selecting the “About” option in the related dropdown window. Your application’s version will display in the “About” window.
If you find that you have version 4.0.0.7 installed, please make a backup copy of your database file and then uninstall your current version of Calibration Recall 4. Once Calibration Recall 4 has been successfully uninstalled, please download and then install the latest version of the application found at the below link:
https://www.harrington-group.com/support/downloads/CalibrationRecall/Version4/CalibrationRecall4.zip
If you need a hand with the installation process of the application, please reach out to Technical Support at 407-382-8750 between the hours of 9AM – 6PM Monday through Friday. You may also submit an email based support request via the following link:
This issue pertains to an instance where a user is unable to specify an email port in the email configuration options menu. The issue was identified within the 4.0.0.7 release of Calibration Recall 4 and has been fixed in later releases of the application due to the additon of the port field. Please check your Calibration Recall 4 version by launching the application, then by clicking on “Help” at the top of the main window, followed by selecting the “About” option in the related dropdown window. Your application’s version will display in the “About” window.
If you find that you have version 4.0.0.7 installed, please make a backup copy of your database file and then uninstall your current version of Calibration Recall 4. Once Calibration Recall 4 has been successfully uninstalled, please download and then install the latest version of the application found at the below link:
https://www.harrington-group.com/support/downloads/CalibrationRecall/Version4/CalibrationRecall4.zip
If you need a hand with the installation process of the application, please reach out to Technical Support at 407-382-8750 between the hours of 9AM – 6PM Monday through Friday. You may also submit an email based support request via the following link:
This issue pertains to instances where some fields may display twice on the Certificate of Calibration Completed report, while other fields may be missing. The issue was identified within the 4.0.0.7 release of Calibration Recall 4 and has been fixed in later releases of the application. Please check your Calibration Recall 4 version by launching the application, then by clicking on “Help” at the top of the main window, followed by selecting the “About” option in the related dropdown window. Your application’s version will display in the “About” window.
If you find that you have version 4.0.0.7 installed, please make a backup copy of your database file and then uninstall your current version of Calibration Recall 4. Once Calibration Recall 4 has been successfully uninstalled, please download and then install the latest version of the application found at the below link:
https://www.harrington-group.com/support/downloads/CalibrationRecall/Version4/CalibrationRecall4.zip
If you need a hand with the installation process of the application, please reach out to Technical Support at 407-382-8750 between the hours of 9AM – 6PM Monday through Friday. You may also submit an email based support request via the following link:
This issue pertains to instances where users may select a custom query from the Custom List dropdown field and as a result sometimes the wrong query is returned. The issue was identified within the 4.0.0.7 release of Calibration Recall 4 and has been fixed in later releases of the application. Please check your Calibration Recall 4 version by launching the application, then by clicking on “Help” at the top of the main window, followed by selecting the “About” option in the related dropdown window. Your application’s version will display in the “About” window.
If you find that you have version 4.0.0.7 installed, please make a backup copy of your database file and then uninstall your current version of Calibration Recall 4. Once Calibration Recall 4 has been successfully uninstalled, please download and then install the latest version of the application found at the below link:
https://www.harrington-group.com/support/downloads/CalibrationRecall/Version4/CalibrationRecall4.zip
If you need a hand with the installation process of the application, please reach out to Technical Support at 407-382-8750 between the hours of 9AM – 6PM Monday through Friday. You may also submit an email based support request via the following link:
This issue pertains to instances where Calibration Recall 4’s Query drop down lists are not automatically sorted alphanumerically. The issue was identified within the version 4.0.0.7 release of Calibration Recall 4 and has been fixed in later releases of the application. Please check your Calibration Recall 4 version by launching the application, then by clicking on “Help” at the top of the main window, followed by selecting the “About” option in the related dropdown window. Your application’s version will display in the “About” window.
If you find that you have version 4.0.0.7 installed, please make a backup copy of your database file and then uninstall your current version of Calibration Recall 4. Once Calibration Recall 4 has been successfully uninstalled, please download and then install the latest version of the application found at the below link:
https://www.harrington-group.com/support/downloads/CalibrationRecall/Version4/CalibrationRecall4.zip
If you need a hand with the installation process of the application, please reach out to Technical Support at 407-382-8750 between the hours of 9AM – 6PM Monday through Friday. You may also submit an email based support request via the following link
This issue pertains to an instance where Calibration Recall 4’s reports cannot be exported to alternate formats, or subsequently emailed either. The issue was identified within the initial release of Calibration Recall 4, version 4.0.0.0 and the features have been added in later version releases of the application. Please check your Calibration Recall 4 version by launching the application, then by clicking on “Help” at the top of the main window, followed by selecting the “About” option in the related dropdown window. Your application’s version will display in the “About” window.
If you find that you have version 4.0.0.0 installed, please make a backup copy of your database file and then uninstall your current version of Calibration Recall 4. Once Calibration Recall 4 has been successfully uninstalled, please download and then install the latest version of the application found at the below link:nk:
https://www.harrington-group.com/support/downloads/CalibrationRecall/Version4/CalibrationRecall4.zip
If you need a hand with the installation process of the application, please reach out to Technical Support at 407-382-8750 between the hours of 9AM – 6PM Monday through Friday. You may also submit an email based support request via the following linknk:
This issue pertains to an instance where grid line coloring options are not available to show due, or coming due tool calibrations. The issue was identified within the initial release of Calibration Recall 4, version 4.0.0.0 and the feature has been added in later version releases of the application. Please check your Calibration Recall 4 version by launching the application, then by clicking on “Help” at the top of the main window, followed by selecting the “About” option in the related dropdown window. Your application’s version will display in the “About” window.
If you find that you have version 4.0.0.0 installed, please make a backup copy of your database file and then uninstall your current version of Calibration Recall 4. Once Calibration Recall 4 has been successfully uninstalled, please download and then install the latest version of the application found at the below link:
https://www.harrington-group.com/support/downloads/CalibrationRecall/Version4/CalibrationRecall4.zip
If you need a hand with the installation process of the application, please reach out to Technical Support at 407-382-8750 between the hours of 9AM – 6PM Monday through Friday. You may also submit an email based support request via the following link:
This issue pertains to an instance where the workgroups drop down list in the User view does not correctly refresh after new groups are added. The issue was identified within the initial release of Calibration Recall 4, version 4.0.0.0 and has been resolved in later version releases of the application. Please check your Calibration Recall 4 version by launching the application, then by clicking on “Help” at the top of the main window, followed by selecting the “About” option in the related dropdown window. Your application’s version will display in the “About” window.
If you find that you have version 4.0.0.0 installed, please make a backup copy of your database file and then uninstall your current version of Calibration Recall 4. Once Calibration Recall 4 has been successfully uninstalled, please download and then install the latest version of the application found at the below link:
https://www.harrington-group.com/support/downloads/CalibrationRecall/Version4/CalibrationRecall4.zip
If you need a hand with the installation process of the application, please reach out to Technical Support at 407-382-8750 between the hours of 9AM – 6PM Monday through Friday. You may also submit an email based support request via the following link:
This issue pertains to an instance where Calibration Recall 4’s Rin view takes a while to load. The issue was identified within the initial release of Calibration Recall 4, version 4.0.0.0 and has been resolved in later version releases of the application. Please check your Calibration Recall 4 version by launching the application, then by clicking on “Help” at the top of the main window, followed by selecting the “About” option in the related dropdown window. Your application’s version will display in the “About” window.
If you find that you have version 4.0.0.0 installed, please make a backup copy of your database file and then uninstall your current version of Calibration Recall 4. Once Calibration Recall 4 has been successfully uninstalled, please download and then install the latest version of the application found at the below link:
https://www.harrington-group.com/support/downloads/CalibrationRecall/Version4/CalibrationRecall4.zip
If you need a hand with the installation process of the application, please reach out to Technical Support at 407-382-8750 between the hours of 9AM – 6PM Monday through Friday. You may also submit an email based support request via the following link
This issue pertains to instances where users encounter a “duplicate” error message during the database conversion process. The issue was identified within released versions of Calibration Recall 4. If you encounter this particular issue, please verify that you do not have duplicate “Custodian” names in your Calibration Recall 3.5.5 database. After removing the duplicate “Custodian” names, try to convert the database via Calibration Recall 4 again.
If this process is still unsuccessful, please reach out to Harrington Group International’s Technical Support department at 407-382-8750 between the hours of 9AM – 6PM Monday through Friday. You may also submit an email based support request via the following link:
Problem: Program is not activated after it was already activated. This problem can occur if the product was activated while a different user was logged into the computer. In other words, if an IT administrator logs in to the computer, activates the software, and then instructs the regular user to login.
More information: A product may only be activated for one user.
Solution: The product will need to be deactivated from the original user and then activated again for the new user.
1. Login to the computer as the original user that activated the product.
2. Open the program in question.
3. Click “Help, Deactivate this software…”:

4. Click the Deactivate button:
5. Click OK:
6. Login as the actual user for the product and open it up.
7. Click the Activate now button and proceed with activating as before. Only proceed to step 8 and 9 if you are unable to activate.
8. If there is a problem communicating with our activation server, you may need to use the Activate by Phone option:

9. Click Activate by Phone and call our technical support department at 407-382-8750. We will ask for the information on the Activate by Phone screen and supply you with an Activation Code.
Purpose:
This document provides a solution to miscellaneous issues accompanying The Harrington Group’s desktop products in regard to report generation and printing capabilities. This process applies to the Audit Master 3, Corrective Action 6, Calibration Recall 3.5, Document Control System 2, and Maintenance Log Pro products.
Instructions:
1. Perform a Windows search for these three files, Cpeaut32.dll, Crpe32.dll, and Crystal32.ocx. If they are found to exist on the client pc, delete them.
2. Next, browse to your product’s installation directory. These paths are shown below.
Audit Master 3: C:\Program Files\Audit Master 3
Corrective Action 6: C:\Program Files\CA6
Calibration Recall 3.5: C:\Program Files\Recall
Document Control System 2: C:\Program Files\Document Control System 2
Maintenance Log Pro: C:\Program Files\Maintenance Log Pro
3. From inside your product’s installation folder, you will need to locate your database file(s). By default, Harrington Group desktop applications store their application databases in the installation folder. Our software’s database files are standard Microsoft Access database files that have an “.mdb” file extension. They are represented by an icon which appears to display a miniature maroon colored key. If you see any file(s) like this inside your installation folder, make a copy of them then paste them on your windows desktop or a backup folder. If you do not find it in the installation folder, chances are it’s somewhere else on your pc, such as your My Documents folder, a shared drive or in a network folder on a local server.
4. While in your product’s installation directory, double click on the icon called, “Unwise.exe”.
5. The program’s uninstaller will launch, select “Custom”, then click on “Select All”, then click the “Next” button, “Select All” again, “Next”, “Select All”, “Next” button…keep repeating “Select All” and “Next” until the button changes to say “Finish”.
6. When the uninstall process is finished, proceed to our website to download the latest version of your product, or reinstall the application from disc. A link to our website is below.
Harrington Group Download Page
7. Install the product normally by proceeding through the multiple prompts. After product installation is complete, launch the program. When one of our desktop applications launch, by default it will try to open the demo database it installed with. To avoid this, click the “Cancel” button on the very first login window you see. Next, click the “File” button in the File menu then click on “Open Database.”
8. From the open file window, you will need to browse to your database file, click on it once, then press the “Open” button. If you have copied and pasted your database file from the installation folder to your desktop screen as demonstrated in step 3, you will need to browse to your desktop via the file open window, click on your database and press the “Open” button. If your database file did not reside in the program’s installation folder, you will need to locate where it is on either your pc, a shared drive, or on your local server. If you cannot find your database file, your IT Manager may be able to assist you by searching for an “.mdb” file that you recognize. The “Open File” window resembles the below image. Note: After the program has been reinstalled it is recommended that you move your database file(s) back into the installation directory if you previously moved them before the uninstall. If they are in an external location, then you can leave them.
9. After opening your database via the open file window, you will be prompted with a login screen. Login to your database as you normally would.
10. Try to run a report and observe if the original report issue still exists, if it does, try contacting us for further support via e-mail at: [email protected].
Additional Comments:
This document should be used as a first step in troubleshooting any reports issues. Please follow this procedure before contacting technical support.
Purpose:
The Information bar pops up when you are downloading files and can cause problems with caWeb and HQMS
Prerequisites:
Internet Explorer 7 or 8
Instructions:
1. Open Internet Explorer.
2. Click the Tools button, and then click Internet Options.
3. Click the Security tab, and then click Custom level.
4. Scroll to the Downloads section of the list.
5. Under Automatic prompting for file downloads, click Enable.
6. Click OK, click Yes to confirm that you want to make the change, and then click OK again.
Installation Requirements:
caWeb 4 is installed onto a Windows 2003 system running the Internet Information Server (IIS) 6.0 (or later). The hardware requirements for the caWeb 4 server components are essentially the same as those for the server on which it is installed. As with any application, faster hardware, more memory, and the latest operating system release will usually result in better performance.
The Harrington Group highly recommends a dedicated server for use with the caWeb 4 application and its database. While caWeb operates efficiently in a shared server environment, a limited number of other Hybrid applications have demonstrated some level of operational conflict with the standard DLLs deployed with caWeb 4.
Users will access caWeb 4 through a web browser, preferably Internet Explorer 6.0 or higher. Generally, performance limitations will be due to bandwidth (the speed at which the client can access the web site) rather than hardware capabilities.
System Requirements:
Minimum Hardware
- 1 GB RAM
- 1 GB RAM
- 1 GHz processor
Recommended Hardware
- 2 GB RAM
- 10 GB RAM
- 2 GHz processor
Operating System: Windows 2003
Database Server: SQL Server 2000 SP4 or higher (SQL Server 2005 recommended)
Prerequisites: Crystal Reports Basic Runtime for Visual Studio 2008
Microsoft .NET Framework 3.5
On the Client:
Minimum Hardware:
56Kbps access to the web site hosted by the server
VGA Display (800 x 600)
Recommended Hardware:
T1 bandwidth or LAN access to the web site hosted by the server
16 bit color, 1024 x 768 display
Other Software Requirements:
Internet Explorer 6.0 (or later)
Internet Explorer 7.0 Recommended
Configure system to accept cookies and JavaScript (usually the default)
Purpose:
Starting with Internet Explorer 8 it has become necessary to open a new session to open one or more instances of HQMS or caWeb. Cookies are shared between tabs and new windows which make it impossible to login to either HQMS or caWeb without creating a new session. These sessions do not share cookies and make it possible to open two or more instances.
Prerequites:
Internet Explorer 8
Instructions:
Click File > New Session. (Click Alt if the File menu is not visible)
Purpose:
These instructions will change the caWeb4 Timeout value from the default 20 minutes to a new value, which may be necessary if:
- System security requires a lower value
- User license management requires a lower value
- User convenience requires a higher value
Prerequisite(s):
It is assumed this process will be applied by a network administrator. caWeb4 must be installed and setup to run correctly in a standard Microsoft Windows Server based environment. IIS 6.0 will also be required.
Instructions:
1. Open Internet Information Services (IIS) Manager and right click on the caWeb4 virtual directory as shown below.
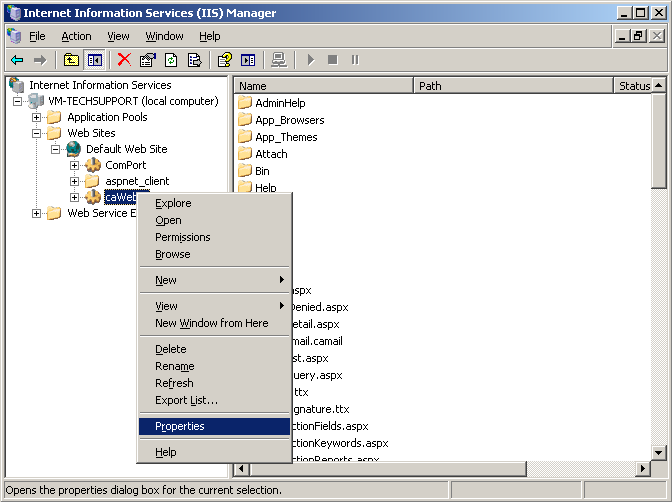
2. Click on the “Properties” option, and choose to the ASP.NET tab in the Properties window that opens.
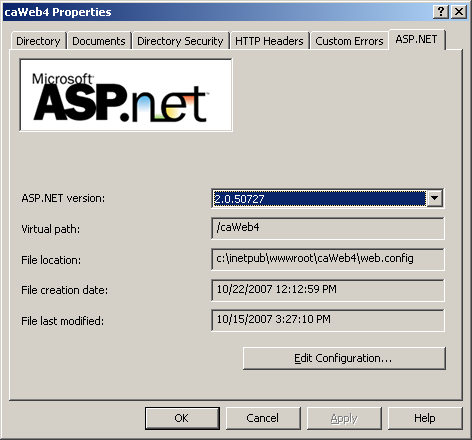
3. Click the button labeled “Edit Configuration” to open the Configuration Settings window.
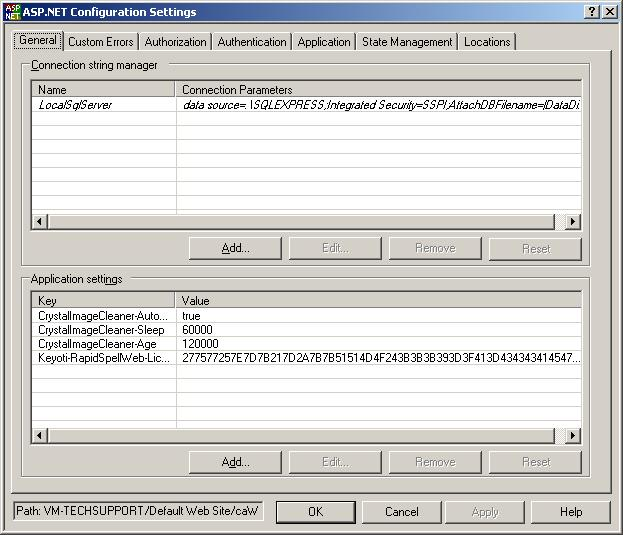
4. Go to the “State Management” tab and change the “Session timeout (minutes):” to your desired value.

5. Click the “Apply” button.
Click the “OK” button to return to the main IIS Manager window.
Additional Comment(s):
- Changing the timeout value will end all active caWeb sessions, logging out any users who are currently logged in. Users will lose any unsaved changes to records.
Version
4.0.1.0
Problem:
The problem system does not have workgroup rights to limit the access to comments.
Fix:
Please contact Techincal Support to upgrade to version 4.0.4.3 or higher.
Version
4.0.1.0
Problem:
In the Action system when a user changes the value of the field “Approval” from “Is Required” to “Is Not Required” the value reverts back “Is Required” when the record is saved
Fix:
Please contact Techincal Support to upgrade to version 4.0.2.3 or higher.
Version
4.0.5.6
Problem:
Users are receiving an error message when accessing the Action Detail page. This is happening for all action records after upgrading to 4.0.5.6 from a previous version.
Fix:
Please contact Technical Support to upgrade to version 4.0.5.7 or higher
Version
4.0.4.3
Problem:
Non-SuperUsers are unable to edit the Category and Action Source fields in the action system.
Fix:
Please contact Techincal Support to upgrade to version 4.0.5.7 or higher.
Purpose:
This guide will show how to install and configure ComPort for caWeb4.
Prerequisite(s):
- Administrative access to the webserver
- ComPort installation files
- SuperUser access to caWeb4
Instructions:
1. Run the ComPort installer.
2. Login to caWeb4 and go to the ComPort Administration page.
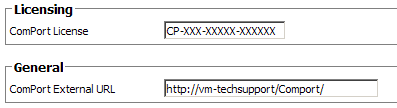
3. Enter your ComPort License and the external url of your ComPort site.
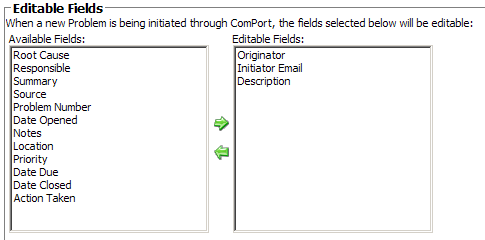
4. Select the fields you wish the user to be able to edit on the Initiate page. (This does not control whether the fields are on the page or not.)
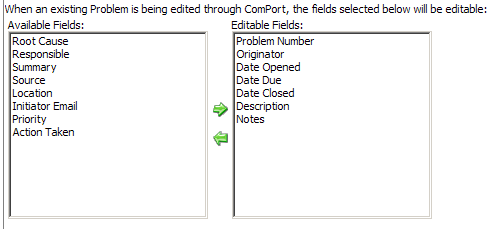
5. Select the fields you wish the user to be able to edit on the page.
6. Set the Security settings for the ComPort page. You can setup ComPort to only allow users to enter new issues (Viewable) or to allow user to edit records as well (Editable).
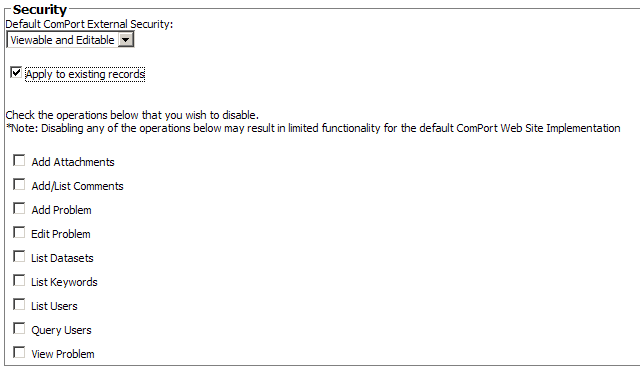
7. Click “Save” to save your changes.
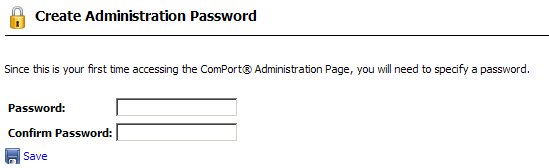
8. Browse out to the ComPort admin page (i.e. http://servername/ComPort/admin.aspx)
9. Set the ComPort Administrator password. Write this password down and keep it in a secure location.
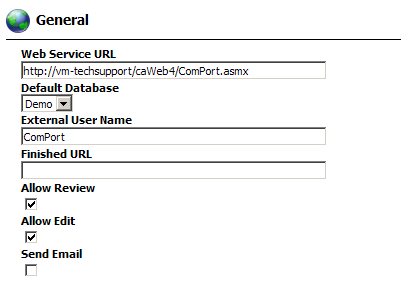
10. Set the Web Service URL and select the database you wish to use ComPort with. (Check “Allow Edit” to allow users to edit records outside of caWeb4)
11. Click “Save” to save your changes.
12. Browse to the ComPort Initiate page to begin using. (i.e. http://servername/ComPort/initiate.aspx)
Version
4.0.4.3
Problem:
The All Records query is available to non-SuperUsers on the Report screen. If the available workgroup is changed from SuperUser to another workgroup, all users are still able to access the query.
Fix:
Please contact Technical Support to upgrade to version 4.0.5.7 or higher.
Version
4.0.5.7
Problem:
Users can see all queries on the Planning Charts even if they are restricted to a certain group or user.
Solution:
Please contact Techincal Support to upgrade to version 4.1.0.6 or higher.
Version
4.0.5.7
Problem:
When selecting users for a email, if the user has to go to the next page, all selected users in the top box are cleared out.
Solution:
Please contact Techincal Support to upgrade to version 4.1.0.6 or higher.
Version
4.0.5.7
Problem:
The planning charts fail when a record has a date closed value before the date opened value.
Solution:
Please contact Technical Support to upgrade to version 4.1.0.6 or higher.
Version
4.0.3.2
Problem:
Unable to delete Actions with a subject that contains greater than 40 characters.
Workaround
Reduce the subect to below 40 characters and then delete the record.
Solution:
Please contact Technical Support to upgrade to version 4.0.4.3 or higher.
Version
4.0.3.2
Problem:
If you apply all the workgroups rights possible to a user, the user cannot re-open a issue.
This includes the originator and responsible/assignee users.
Solution:
Please contact Technical Support to upgrade to version 4.0.4.3 or higher.
Version
4.0.3.2
Problem:
The field label changes are not being properly applied to the alert messages when a field is required. The messages show the original field name.
Solution:
Please contact Technical Support to upgrade to version 4.0.4.3 or higher.
Problem:
User receives the error message “The system cannot find the file specified” when trying to run a report. This error occurs when opening a
report that points to a file that no longer exists.
Prerequisites:
- Superuser access to caWeb4.
- Administrator access to webserver.
Instructions:
1. Login to caWeb4 and go to Administration > Problem > Reports.
2. Check to see what filename the report is pointing to.

3. Logon to the webserver and go to the reports directory (C:\Inetpub\wwwroot\caWeb4\Reports).
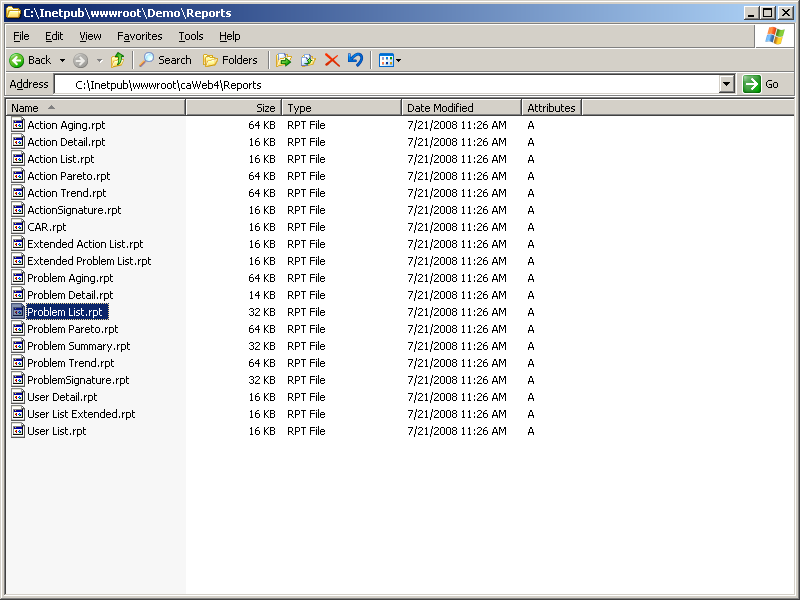
4. Verify the file does not exist.
5. Add the report file back to the reports directory or remove the report registration from caWeb4.
Version
4.0.4.3
Problem:
No History item is added when an attachment is deleted.
Solution:
Please contact Technical Support to upgrade to version 4.0.5.7 or higher.
Version
4.0.3.2
Problem:
When Away Mode is enabled for a user the checkbox becomes deselected and the user’s name selected is removed after clicking Save.
Solution:
Please contact Technical Support to upgrade to version 4.0.4.3 or higher.
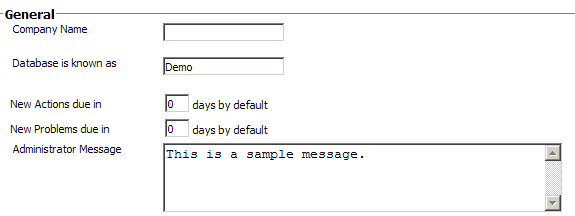
Purpose:
caWeb includes a feature to display administrator messages on the login page.
Prerequisites:
Superuser account in caWeb
Instructions
1. Login as a superuser to caWeb.
2. Click on Administration, then General.
3. Enter an Admin message and click Save.